Lab 10: Virtual Trackball
Expected due date: 23-11-2022
Learning Objectives:
Tasks:
Part 1: Simple Orbiting
The scene for this laboratory will be the simple 3D model from our Lab 5
which is simply a floating monkey's head. We also use the background
color form the Lab 4 for no other purpose than for aesthetic. With the
scene setup we can implement the purpose of this lab, model rotation
with mouse input. To get the mouse input by the user the application
will use four mouse events; mouse down, mouse up, mouse leave, and mouse
move. The first of these is the most obvious, whenever the user clicks
on the canvas we will use this to start the rotation of the monkey. This
rotation is dictated by two main variables;
currentAngle which will be used to modify the model matrix
and lastPos which tracks the mouse's position on the
canvas. As such the code for the mouse down event is the following:
canvas.onmousedown = function(ev) {
    var x = ev.clientX, y = ev.clientY;
    // Start dragging if a mouse is in <canvas>
            var rect = ev.target.getBoundingClientRect();
            if (rect.left <= x && x < rect.right && rect.top <= y && y < rect.bottom) {
                lastPos = [x, y];
                dragging = true;
                if (debuggerOn) {
                    console.log("Dragging started last position: " + lastPos);
                }
            }
}
This simply takes the screen position of the mouse click and then
enables the dragging flag which will consider the user dragging their
canvas to rotate the object. Furthermore, this dragging flag is unset by
the two mouse events; onmouseleave the event of the mouse
leaving the canvas and onmouseup the event of the mouse
button being released. This leaves the onmousemove event
which tracks the movement of the mouse across the canvas. The code for
this event is shown in the code block below:
   canvas.onmousemove = function (ev) {
            var x = ev.clientX, y = ev.clientY;
            if (dragging) {
                var factor = 100 / canvas.height; // The rotation ratio
                var dx = factor * (x - lastPos[0]);
                var dy = factor * (y - lastPos[1]);
                // Limit x-axis rotation angle to -90 to 90 degrees
                currentAngle[0] = Math.max(Math.min(currentAngle[0] + dy, 90.0), -90.0);
                currentAngle[1] = currentAngle[1] + dx;

                if (debuggerOn) {
                    //console.log("Mouse moved to: " + x + ", " + y);
                }
            }
            lastPos = [x, y];
        };
These mouse events basically update the
currentAngle variable responsible for the creation of the
rotation matrix of the model matrix as shown in the code below:
modelMatrix = mult(modelMatrix, rotate(currentAngle[0], 1, 0, 0));
modelMatrix = mult(modelMatrix, rotate(currentAngle[1], 0, 1, 0));
Result
Part 2: Quaternion Rotation
In the previous part we used rotation in between 0 and 90 degrees as
tracked by the currentAngle variable. In this part we will
look at rotations done in the popular quaternion number system. To do
the quaternion mathematics we will use the provided quaternion helper
functions. First we get the mouse coordinates which we need to map the
flat mouse click on the screen to a sphere for the quaternion rotation.
As such we need to use the click position formula from Lab 2 as seen
below:
var clickPosition = [-1 + ((mouseX - cRectangle.left) / canvas.width) * 2,
    (-1 + ((mouseY - cRectangle.top) / canvas.height) * 2);
    ];
These normalized click coordinates can be now mapped to a sphere by
following the formulas shown in the image below:
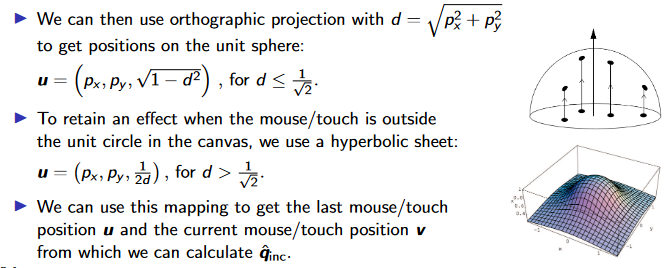
Using the mapped coordinates we can now calculate the quaternion we nee
to rotate to, qInc and thus get our full quaternion
rotation matrix and apply it to our view matrix. The
onmousemove event gets changed to the code below:
var x = ev.clientX, y = ev.clientY;
var rect = ev.target.getBoundingClientRect();

if (dragging) {
    x = ((x - rect.left) / rect.width - 0.5) * 2;
    y = (0.5 - (y - rect.top) / rect.height) * 2;

    var prevPosition = vec3(lastPos[0], lastPos[1], mapSphere(lastPos[0], lastPos[1]));
    var currentPosition = vec3(x, y, mapSphere(x, y));

    qInc = qInc.make_rot_vec2vec(normalize(currentPosition), normalize(prevPosition));
    qRot = qRot.multiply(qInc);

    if (debuggerOn) {
        console.log("Current position: " + currentPosition);
        console.log("prevPosition: " + prevPosition);
        console.log("Rotation: " + rotation);
    }
}

lastPos = [x, y];
Which will allow the updating of the model matrix in the render method
with the following lines of code:
up = qRot.apply(vec3(0,1,0));
eye = qRot.apply(vec3(0,0,5));
Result
Part 3: Dolly and Panning
Dolly and panning are ways to manipulate the eye part of the view matrix
in order to move the camera around the scene. Dolly is the act of moving
the camera's z-axis while panning is moving the camera at a plane
(x, y) parallel to the current image. There is not much to this
implementation as it is just tracking if the check box is turned on to
determine what dragging on the canvas does. All of the added code is
mostly inside the
onmousemove event as shown below:
 if (dragging) {
                if (dollyMode) {
                    var delta = lastPos[1] - y;
                    zEye += delta;

                    if (zEye < MIN_Z) {
                        zEye = MIN_Z;
                    } else if (zEye > MAX_Z) {
                        zEye = MAX_Z;
                    }

                    if (debuggerOn) {
                        console.log("Dolly: " + zEye);
                    }

                } else if (panningMode) {
                    var deltaX = lastPos[0] - x;
                    var deltaY = lastPos[1] - y;

                    if (deltaX < 0) {
                        pan[0] += PANNING_SPEED;
                    } else if (deltaX > 0) {
                        pan[0] -= PANNING_SPEED;
                    }

                    if (deltaY < 0) {
                        pan[1] -= PANNING_SPEED;
                    } else if (deltaY > 0) {
                        pan[1] += PANNING_SPEED;
                    }

                    if (debuggerOn) {
                        console.log("Panning: " + pan);
                    }
                } else {
                    x = ((x - rect.left) / rect.width - 0.5) * 2;
                    y = (0.5 - (y - rect.top) / rect.height) * 2;

                    var prevPosition = vec3(lastPos[0], lastPos[1], mapSphere(lastPos[0], lastPos[1]));
                    var currentPosition = vec3(x, y, mapSphere(x, y));

                    qInc = qInc.make_rot_vec2vec(normalize(currentPosition), normalize(prevPosition));
                    qRot = qRot.multiply(qInc);

                    if (debuggerOn) {
                        console.log("Current position: " + currentPosition);
                        console.log("prevPosition: " + prevPosition);
                        console.log("Rotation: " + qRot);
                    }
                }
            }
Result
Part 4: Spinning
If we go back to the solution for quaternion rotations we can actually
make the monkey spin for ever as long as we instead apply the
multiplication in the render method in stead of at every
onmousemove event. In order to stop the monkey from
spinning we need to use the setIdentity whenever the
mousedown event happens. The spinning monkey is done simply
by saving the quaternion at the time of of calculation as shown in the
pseudo code below:
/// mousedown
prevQuaternion.setIdentity();

// onmousemove
qInc = qInc.make_rot_vec2vec(normalize(currentPostion), normalize(prevPosition));
qRot = qRot.multiply(qInc);

// render
qRot = qRot.multiply(qInc);

// Use quaternion to rotate the viewMatrix
Result